Créer un RCCA et le lier à un indicateur
Traduction automatique de l'anglais. Original en anglais affiché.
You can create a root cause analysis (RCCA) report and link it to a particular metric dashboard.
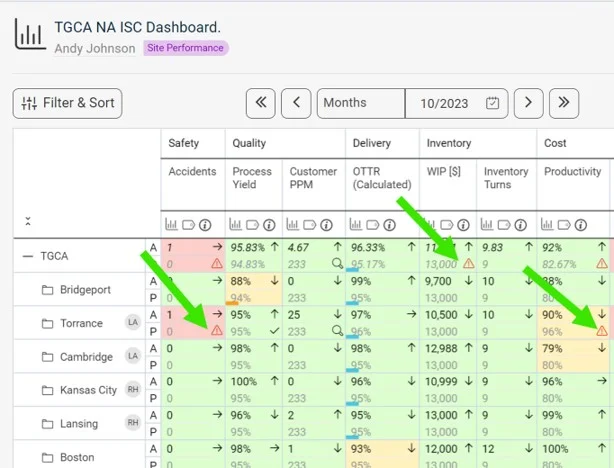
See the RCCA icon in the dashboard
Once the RCCA document is linked to a certain metric/unit combination, the RCCA icon is displayed in the dashboard, as shown below.
Create the RCCA document
-
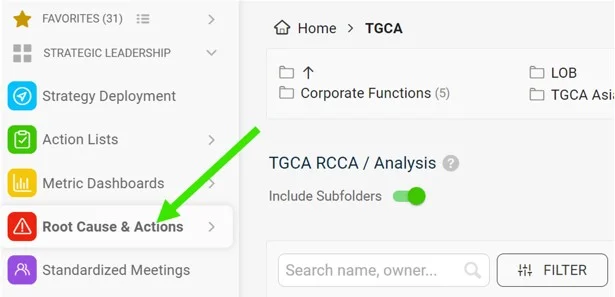
Open the Root Cause & Actions module. Go to the Root Cause & Actions module on the left-hand side of the screen.
-
Click Create New. Click Create New on the right side of the screen.
-
Add a title and choose the type. Add a title and choose the type of RCCA.
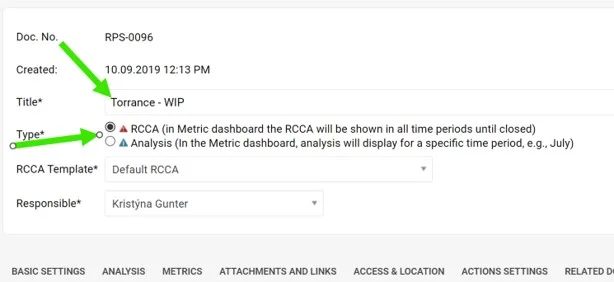
There are two types of RCCA. The only difference is how long the RCCA icon (a triangle) is displayed in the metric dashboard, if it is a metric-related RCCA document. The red RCCA (1st option) displays the red triangle icon in the dashboard the whole time until the RCCA document is closed. The blue RCCA (2nd option) displays the blue triangle icon in the metric dashboard only for the default period of the metric dashboard (e.g. in a weekly dashboard only for the week, in a monthly dashboard only for the month in which the RCCA document was created).
-
Select the RCCA template.
-
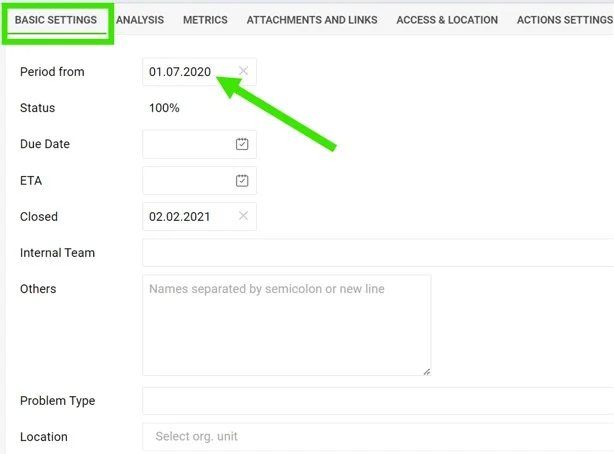
Fill in the details. Fill in the details under each of the tabs. In Basic Settings, it is important to fill in the Period from which the RCCA icon will be displayed in the metric dashboard (if the RCCA document is metric-related).
-
Fill in the analysis. The analysis and Pareto charts can be filled in on the 2nd tab, Analysis.
-
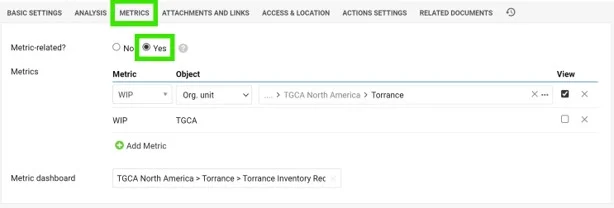
Link the metric. To link the RCCA document to a certain metric/unit combination, set it up under the 3rd tab, Metrics. Here you can also link a particular metric dashboard.
Video guide: creating a new RCCA
Vous pouvez créer un rapport d’analyse des causes (RCCA) et le lier à un tableau de bord KPI.
Voir l’icône RCCA dans le tableau de bord
Une fois le document RCCA lié à une combinaison indicateur / unité, l’icône RCCA s’affiche dans le tableau de bord, comme ci-dessous.
Créer le document RCCA
-
Ouvrez le module Analyse des causes et actions correctives. Ouvrez le module Analyse des causes et actions correctives dans le menu de gauche.
-
Cliquez sur Créer. Cliquez sur Créer, à droite de l’écran.
-
Saisissez un titre et choisissez le type. Saisissez un titre et choisissez le type de RCCA.
Il existe deux types de RCCA. Ils ne diffèrent que par la durée d’affichage de l’icône RCCA (un triangle) dans le tableau de bord, si le document RCCA est lié à un indicateur. Le RCCA rouge (1re option) affiche le triangle rouge dans le tableau de bord jusqu’à la clôture du document RCCA. Le RCCA bleu (2e option) affiche le triangle bleu uniquement pendant la période par défaut du tableau de bord (par exemple, la semaine dans un tableau hebdomadaire, le mois dans un tableau mensuel où le document RCCA a été créé).
-
Sélectionnez le modèle de RCCA.
-
Renseignez les détails. Remplissez chaque onglet. Dans Paramètres de base, renseignez bien la Période à partir de laquelle l’icône RCCA s’affichera dans le tableau de bord (si le document RCCA est lié à un indicateur).
-
Renseignez l’analyse. L’analyse et les diagrammes de Pareto se remplissent dans le 2e onglet, Analyse.
-
Liez l’indicateur. Pour lier le document RCCA à une combinaison indicateur / unité, utilisez le 3e onglet, Indicateurs. Vous pouvez aussi y lier un tableau de bord KPI.
Tutoriel vidéo : créer un RCCA
Besoin d'aide supplémentaire ?
Écrivez-nous. Les jours ouvrés, nous répondons en général en moins d'une heure.