Como configurar as cores automáticas
Tradução automática do inglês. Exibindo o original em inglês.
Metric dashboard color coding can work automatically. For that, the metric type must be defined as positive (above the target) or negative (below the target).
Conditions for automatic color coding
- Actual and plan values. The metric dashboard contains both actual and plan values.
- Metric type. The metric is defined in its profile as described below.
Define the metric type
-
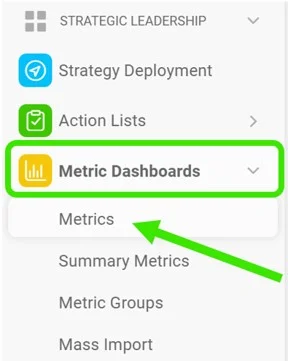
Open the metric list. Go to the Metric Dashboards module and select Metrics in the submenu.
-
Edit the metric. Click the Edit icon.

-
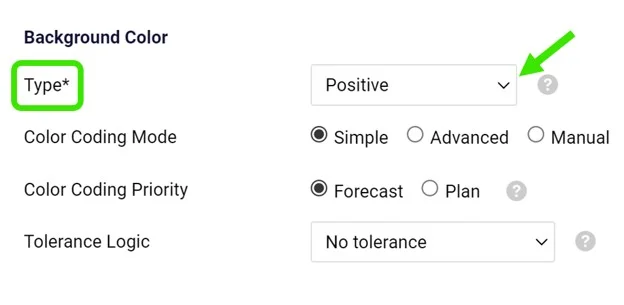
Select the metric type. Select Positive as the metric type for values that should be above the target, or Negative for values that should be below the target.
The basic color coding works with red and green. In addition, yellow (amber) can be used directly in your dashboard when the value is within the tolerance. See How to set up amber color for metrics in a dashboard.
As cores do dashboard de KPI podem funcionar automaticamente. Para isso, o tipo da métrica precisa ser definido como positivo (acima da meta) ou negativo (abaixo da meta).
Condições para as cores automáticas
- Valores reais e planejados. O dashboard de KPI contém valores reais e planejados.
- Tipo de métrica. A métrica está definida no perfil dela, como descrito abaixo.
Definir o tipo de métrica
-
Abra a lista de métricas. Abra o módulo Dashboards de KPI e selecione Métricas no submenu.
-
Edite a métrica. Clique no ícone Editar.
-
Selecione o tipo de métrica. Selecione Positiva como tipo de métrica para valores que devem ficar acima da meta, ou Negativa para valores que devem ficar abaixo da meta.
As cores básicas são vermelho e verde. Além disso, o amarelo pode ser usado diretamente no dashboard quando o valor estiver dentro da tolerância. Veja Como configurar a cor amarela para métricas em um dashboard.
Precisa de mais ajuda?
Escreva para nós. Em dias úteis, costumamos responder em até uma hora.