Jak nastavit automatické barevné označení
Strojový překlad z angličtiny. Zobrazen anglický originál.
Metric dashboard color coding can work automatically. For that, the metric type must be defined as positive (above the target) or negative (below the target).
Conditions for automatic color coding
- Actual and plan values. The metric dashboard contains both actual and plan values.
- Metric type. The metric is defined in its profile as described below.
Define the metric type
-
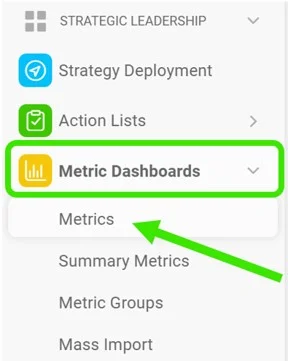
Open the metric list. Go to the Metric Dashboards module and select Metrics in the submenu.
-
Edit the metric. Click the Edit icon.

-
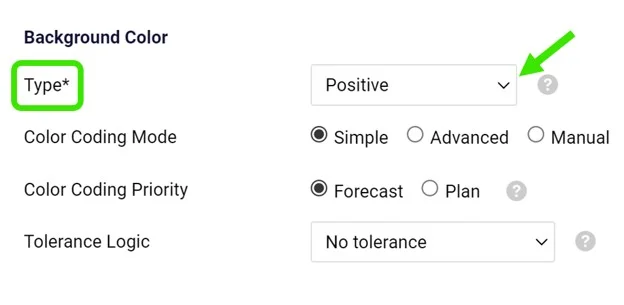
Select the metric type. Select Positive as the metric type for values that should be above the target, or Negative for values that should be below the target.
The basic color coding works with red and green. In addition, yellow (amber) can be used directly in your dashboard when the value is within the tolerance. See How to set up amber color for metrics in a dashboard.
Barevné označení v metrikovém dashboardu může fungovat automaticky. Typ metriky ale musí být definován jako pozitivní (nad cílem) nebo negativní (pod cílem).
Podmínky automatického barevného označení
- Skutečné a plánované hodnoty. Metrikový dashboard obsahuje skutečné i plánované hodnoty.
- Typ metriky. Metrika má ve svém profilu definovaný typ, jak je popsáno níže.
Definice typu metriky
-
Otevřete seznam metrik. Přejděte do modulu Metrikové dashboardy a v podnabídce zvolte Metriky.
-
Upravte metriku. Klikněte na ikonu Upravit.
-
Vyberte typ metriky. Pro hodnoty, které mají být nad cílem, zvolte typ metriky Pozitivní; pro hodnoty, které mají být pod cílem, zvolte Negativní.
Základní barevné označení pracuje s červenou a zelenou. Navíc můžete přímo v dashboardu použít žlutou (oranžovou), když je hodnota v toleranci. Viz Jak nastavit oranžovou barvu pro metriky v dashboardu.
Potřebujete další pomoc?
Napište nám. V pracovní dny obvykle odpovídáme do hodiny.