Ako nastaviť automatické farebné označenie
Strojový preklad z angličtiny. Zobrazený je anglický originál.
Metric dashboard color coding can work automatically. For that, the metric type must be defined as positive (above the target) or negative (below the target).
Conditions for automatic color coding
- Actual and plan values. The metric dashboard contains both actual and plan values.
- Metric type. The metric is defined in its profile as described below.
Define the metric type
-
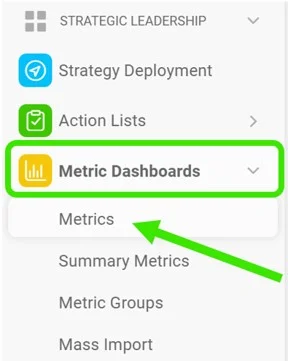
Open the metric list. Go to the Metric Dashboards module and select Metrics in the submenu.
-
Edit the metric. Click the Edit icon.

-
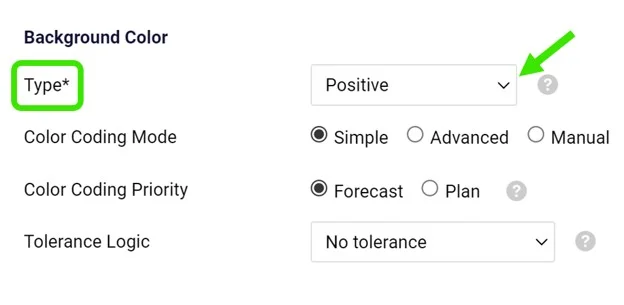
Select the metric type. Select Positive as the metric type for values that should be above the target, or Negative for values that should be below the target.
The basic color coding works with red and green. In addition, yellow (amber) can be used directly in your dashboard when the value is within the tolerance. See How to set up amber color for metrics in a dashboard.
Farebné označenie v KPI dashboarde môže fungovať automaticky. Typ metriky musí byť na to definovaný ako pozitívny (nad cieľom) alebo negatívny (pod cieľom).
Podmienky automatického farebného označenia
- Skutočné a plánované hodnoty. KPI dashboard obsahuje skutočné aj plánované hodnoty.
- Typ metriky. Metrika je vo svojom profile definovaná tak, ako je opísané nižšie.
Definovanie typu metriky
-
Otvorte zoznam metrík. Otvorte modul KPI dashboardy a v podmenu vyberte Metriky.
-
Upravte metriku. Kliknite na ikonu Upraviť.
-
Zvoľte typ metriky. Pre hodnoty, ktoré majú byť nad cieľom, zvoľte typ metriky Pozitívna; pre hodnoty, ktoré majú byť pod cieľom, zvoľte Negatívna.
Základné farebné označenie pracuje s červenou a zelenou. Okrem toho môžete priamo v dashboarde použiť žltú (oranžovú), keď je hodnota v rámci tolerancie. Pozrite Ako nastaviť oranžovú farbu pre metriky v dashboarde.
Potrebujete ďalšiu pomoc?
Napíšte nám. V pracovné dni zvyčajne odpovedáme do hodiny.