Como configurar notificações do dashboard de KPI
Tradução automática do inglês. Exibindo o original em inglês.
Would you like to keep data entry up to date in all your metric dashboards with ease? You can receive automatic notifications before your data entry due date, and you can also be notified if any data is missing and overdue.
Watch the video guide, or follow the text instructions below.
Set up automatic notifications
-
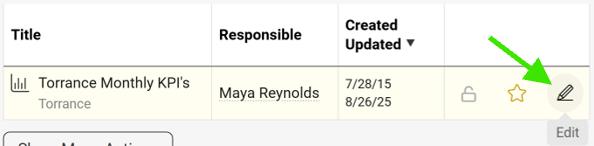
Open the dashboard settings. Go to your metric dashboard’s settings (click the edit pencil).
-
Define the notification settings. Scroll down, click the Automatic Notifications tab and define your settings.
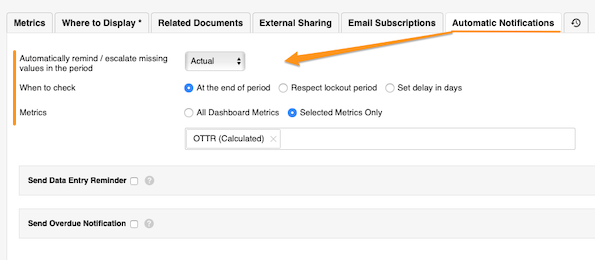
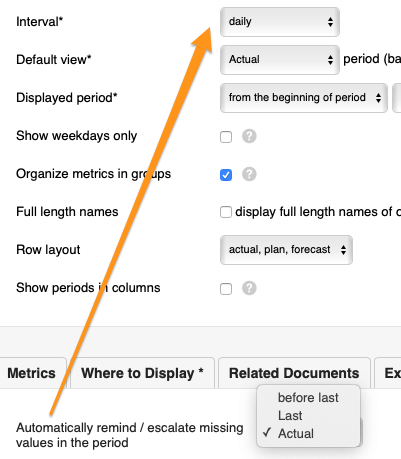
The Automatically remind/escalate missing values in the period setting is based on your dashboard’s interval.
-
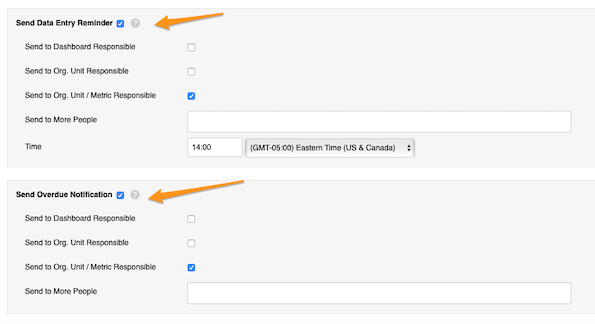
Set up reminders and overdue notifications. Set up your Send Data Entry Reminder and Send Overdue Notification settings.
Set up the responsible
Dashboard responsible
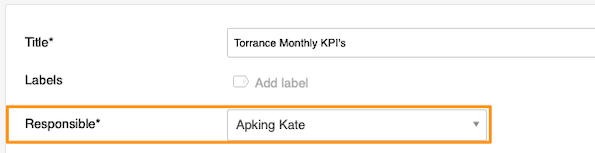
Select a user under Responsible at the top of the settings.
Org. unit responsible
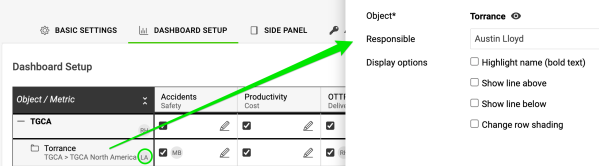
Go to the Dashboard Setup tab, click your object and select the responsible. Their initials are displayed next to the object.
Org. unit and metric responsible
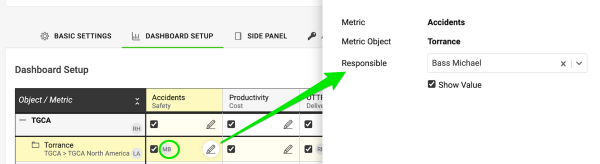
Click the edit pencil for the combination of your metric and object and select the responsible. Their initials are displayed as well.
Quer manter o lançamento de dados em dia em todos os seus dashboards de KPI sem esforço? Você pode receber notificações automáticas antes do prazo de lançamento e também ser avisado quando algum dado estiver faltando ou atrasado.
Assista ao guia em vídeo ou siga as instruções em texto abaixo.
Configure as notificações automáticas
-
Abra as configurações do dashboard. Acesse as configurações do dashboard de KPI (clique no lápis de edição).
-
Defina as notificações. Role para baixo, clique na aba Notificações automáticas e defina as configurações.
A configuração Lembrar/escalonar automaticamente valores ausentes no período se baseia no intervalo do dashboard.
-
Configure lembretes e avisos de atraso. Configure as opções Enviar lembrete de lançamento de dados e Enviar notificação de atraso.
Defina os responsáveis
Responsável pelo dashboard
Selecione um usuário em Responsável, no topo das configurações.
Responsável pela unidade org.
Acesse a aba Configuração do dashboard, clique no objeto e selecione o responsável. As iniciais dele aparecem ao lado do objeto.
Responsável pela unidade org. e pela métrica
Clique no lápis de edição da combinação de métrica e objeto e selecione o responsável. As iniciais dele também aparecem.
Precisa de mais ajuda?
Escreva para nós. Em dias úteis, costumamos responder em até uma hora.