So richten Sie die Farbcodierung einer Kennzahl ein
Maschinelle Übersetzung aus dem Englischen. Englisches Original wird angezeigt.
Metric color coding in your dashboard can be set up in several ways, based on your preference. You need a sufficient role to edit metric settings.
Open the color settings
Open the metric settings
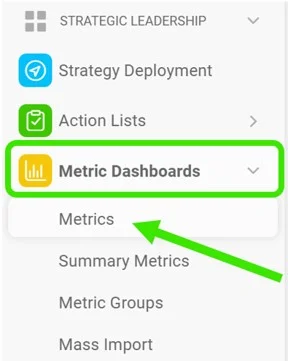
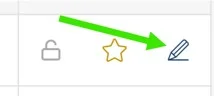
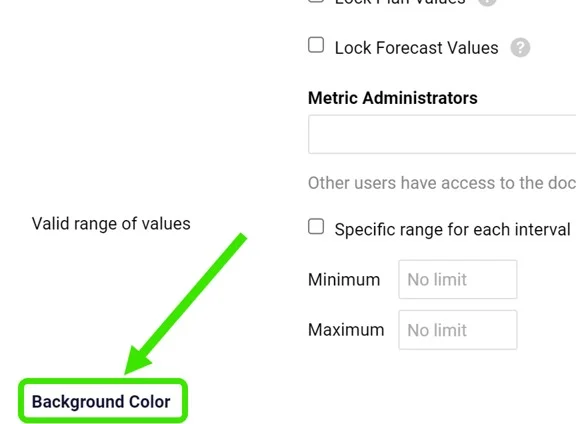
Go to Metrics, click the edit pencil next to your metric and customize the Background Color section.
Choose the metric type
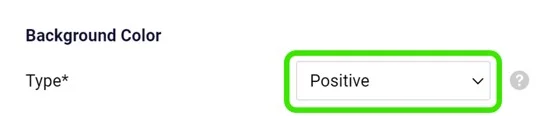
Choose the Type: Positive or Negative. The type drives the automatic color coding. Use Positive for metrics where it is good to be above the plan (e.g. revenue), and Negative for the opposite.
Select the color coding mode
Select the Color Coding Mode. The options are described below.
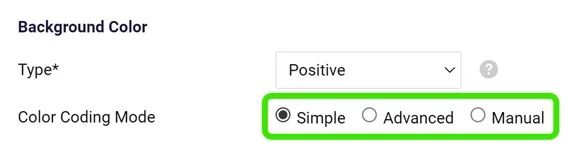
Color coding modes
Simple mode
With the Simple option, your metric is color-coded based on the Type you selected and on the Color Coding Priority (forecast or plan).
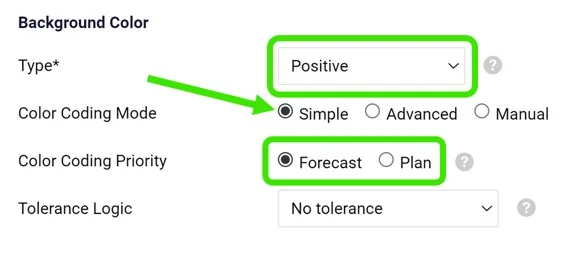
Color coding is displayed only if both the plan (or forecast) and the actual values are entered. You choose only the priority: if the priority value (e.g. forecast) is not entered but the plan value is, the color is based on the plan value.
Amber tolerance
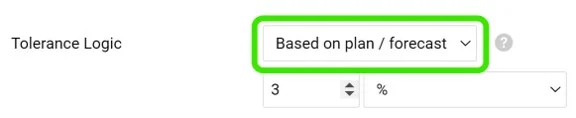
In simple mode, you can also set up amber color coding in the Tolerance Logic field. If the actual value is worse than the target but within the defined interval, the cell is displayed in amber instead of red.
Advanced mode
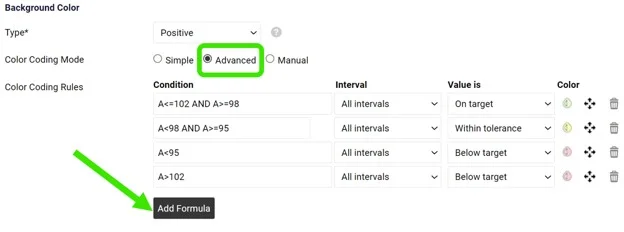
With the Advanced option, you can customize your Color Coding Rules. With this option, the plan or forecast values do not need to be entered.
Set up your Condition (add the formulas needed), Intervals, Value is and Color.
Please contact us if you need any assistance setting it up.
Manual mode
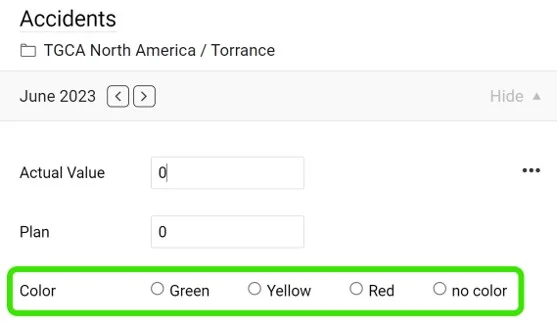
With the Manual option, you set up and modify the color manually, directly in your cell and its pop-up window.
Customize colors per dashboard
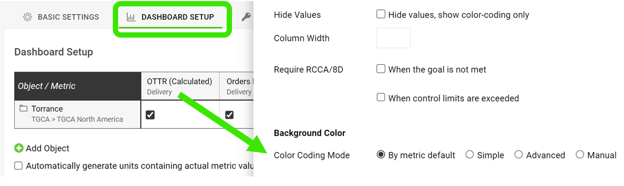
Customize the dashboard setup
The color coding and tolerance selected in your metric settings are applied and displayed by default in all dashboards where the metric is used.
However, you can also customize both directly in your dashboard or template if needed. If you customize them at the dashboard level, the setup applies only to that specific dashboard, or to all the dashboards included in the template.
Customize the template setup
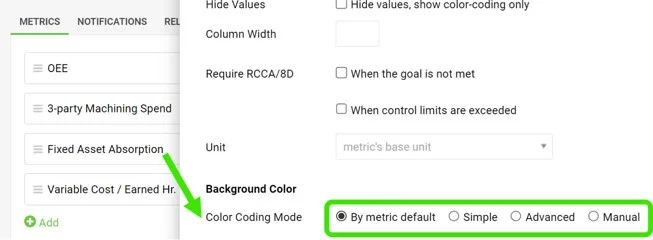
The same customization is available in the template setup.
View the colored cells
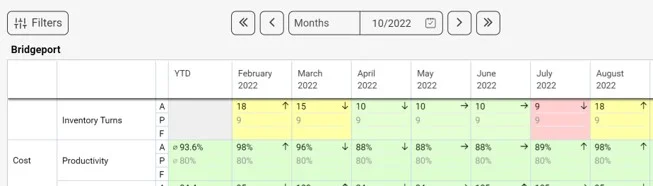
Once your color coding preference is set up, the cell background is colored accordingly.
Die Farbcodierung einer Kennzahl im Dashboard lässt sich je nach Vorliebe auf mehrere Arten einrichten. Zum Bearbeiten der Kennzahleinstellungen brauchen Sie eine ausreichende Rolle.
Farbeinstellungen öffnen
Kennzahleinstellungen öffnen
Öffnen Sie Kennzahlen, klicken Sie neben Ihrer Kennzahl auf das Stiftsymbol und passen Sie den Bereich Hintergrundfarbe an.
Kennzahltyp wählen
Wählen Sie den Typ: Positiv oder Negativ. Der Typ steuert die automatische Farbcodierung. Positiv gilt für Kennzahlen, bei denen ein Wert über Plan gut ist (z. B. Umsatz), Negativ für den umgekehrten Fall.
Farbcodierungsmodus wählen
Wählen Sie den Farbcodierungsmodus. Die Optionen sind unten beschrieben.
Farbcodierungsmodi
Modus Einfach
Mit der Option Einfach wird Ihre Kennzahl anhand des gewählten Typs und der Priorität der Farbcodierung (Prognose oder Plan) eingefärbt.
Die Farbcodierung erscheint nur, wenn sowohl Plan (oder Prognose) als auch Ist-Wert eingegeben sind. Sie wählen nur die Priorität: Fehlt der priorisierte Wert (z. B. die Prognose), ist aber der Planwert vorhanden, richtet sich die Farbe nach dem Planwert.
Gelb-Toleranz
Im Modus Einfach können Sie im Feld Toleranzlogik auch eine gelbe Farbcodierung einrichten. Ist der Ist-Wert schlechter als das Ziel, liegt aber im festgelegten Intervall, wird die Zelle gelb statt rot angezeigt.
Modus Erweitert
Mit der Option Erweitert legen Sie eigene Farbcodierungsregeln fest. Bei dieser Option müssen Plan- oder Prognosewerte nicht eingegeben sein.
Richten Sie Bedingung (mit den nötigen Formeln), Intervalle, Wert ist und Farbe ein.
Wenn Sie Hilfe bei der Einrichtung brauchen, schreiben Sie uns.
Modus Manuell
Mit der Option Manuell legen Sie die Farbe von Hand fest und ändern sie direkt in der Zelle und ihrem Pop-up-Fenster.
Farben pro Dashboard anpassen
Dashboard-Aufbau anpassen
Die in den Kennzahleinstellungen gewählte Farbcodierung und Toleranz gelten standardmäßig in allen Dashboards, in denen die Kennzahl verwendet wird.
Bei Bedarf können Sie beides aber direkt im Dashboard oder in der Vorlage anpassen. Eine Anpassung auf Dashboard-Ebene gilt nur für dieses Dashboard, eine Anpassung in der Vorlage für alle Dashboards, die zur Vorlage gehören.
Vorlage anpassen
Dieselbe Anpassung ist auch im Vorlagenaufbau möglich.
Eingefärbte Zellen
Sobald Ihre Farbcodierung eingerichtet ist, wird der Zellhintergrund entsprechend eingefärbt.
Brauchen Sie weitere Hilfe?
Schreiben Sie uns. An Werktagen antworten wir meist innerhalb einer Stunde.