So erstellen Sie eine neue Checkliste und Vorlage
Maschinelle Übersetzung aus dem Englischen. Englisches Original wird angezeigt.
Checklists help you define the standard items that need to be completed or approved to meet your process requirements.
Checklists can be used for many different purposes, including change management processes: a new product introduction (the whole process or individual phases), production line modifications, IT infrastructure changes, etc.
Video guide
Create a checklist
-
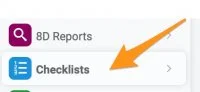
Open the Checklists module. To create a new checklist, go to the Checklists module and follow the next steps.
-
Add a new checklist. Click the Add icon.

-
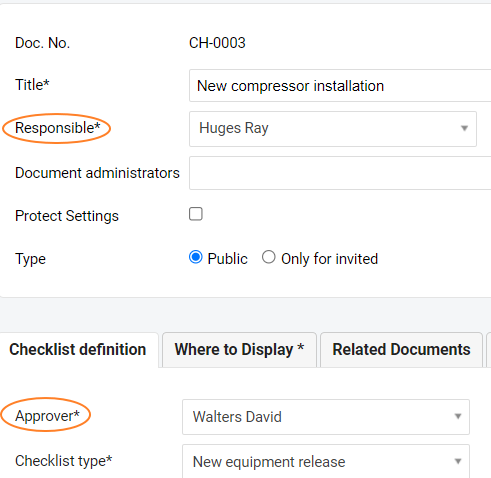
Fill in the basic fields. Define the basic fields such as the title, the responsible person, Protect Settings, etc.
-
Choose the approver and the checklist type. Go to the Checklist definition tab and choose an approver and a checklist type (template). See how to create a new checklist type.
-
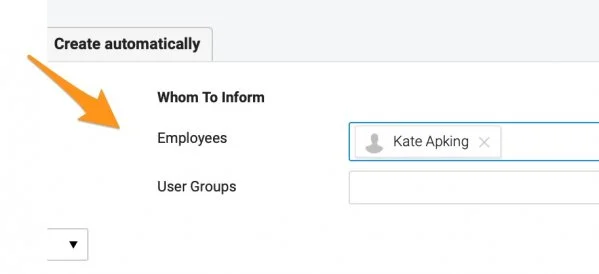
Choose whom to inform. Define your Whom To Inform group: select who should be informed about this document and receive email notifications about new updates and comments.
-
Add the details and save. Add a description and attachments if needed. Save the document once you are done with your settings.
-
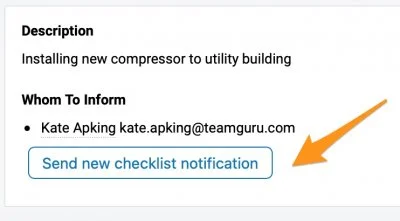
Notify your team. When you are done with your settings, click the Send new checklist notification button. Your Whom To Inform group is notified by email about the new checklist.
Send update notifications
After you click this button, it changes to the Send checklist update notification button.
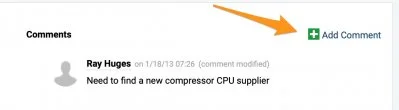
Click this button whenever you want to inform your team about any update in your checklist, except for comments. When you add a comment and click Save & Send, your Whom To Inform group receives the email notifications.
Update and approve the items
Update an item
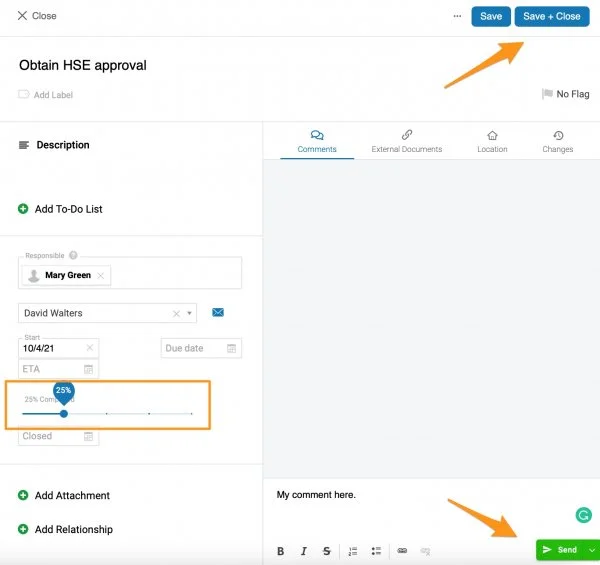
Once a checklist is defined, the responsible person can update the status of the items (add notes, progress status, ETA, etc.). Click an item to update it.
Once you make any modifications, use the Save + Close button to save the updates, and use Send to send a comment to the responsible person.
Request an approval
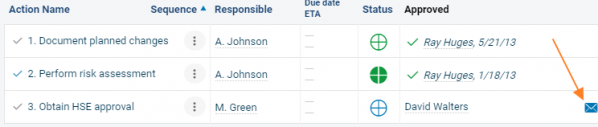
The predefined approver can approve the individual items. To request an approval, click the envelope icon.
Approval request email
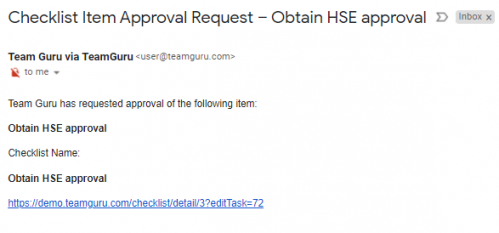
The approver receives an email notification with a live link to the task.
Approve an item
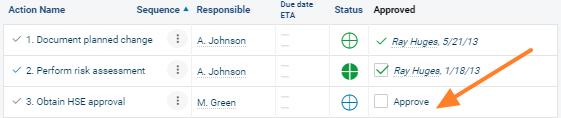
The approver can approve the item by ticking the Approve field.
Create checklists automatically
Set up automatic creation
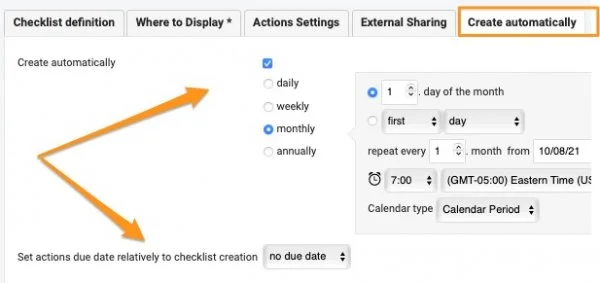
You can also set up a checklist to be created automatically. Go to the Create automatically tab in the settings, tick the field and set up your time period.
You can also set the due dates of the actions in your future checklists based on their creation date.
Recognize an automatic series
You will then see this icon next to your document. It indicates that new checklists of the same series are automatically created based on this document.

Mit Checklisten legen Sie die Standardpunkte fest, die erledigt oder freigegeben werden müssen, damit Ihr Prozess die Anforderungen erfüllt.
Checklisten eignen sich für viele Zwecke, auch für das Änderungsmanagement: Einführung eines neuen Produkts (der gesamte Prozess oder einzelne Phasen), Änderungen an einer Fertigungslinie, Änderungen der IT-Infrastruktur usw.
Video-Anleitung
Checkliste erstellen
-
Öffnen Sie das Modul Checklisten. Um eine neue Checkliste zu erstellen, öffnen Sie das Modul Checklisten und folgen Sie den nächsten Schritten.
-
Fügen Sie eine neue Checkliste hinzu. Klicken Sie auf das Symbol Hinzufügen.
-
Füllen Sie die Grundfelder aus. Legen Sie die Grundfelder fest, etwa Titel, verantwortliche Person, Einstellungen schützen usw.
-
Wählen Sie Freigebenden und Checklistentyp. Wählen Sie auf der Registerkarte Checklistendefinition einen Freigebenden und einen Checklistentyp (Vorlage). Siehe So erstellen Sie einen neuen Checklistentyp.
-
Legen Sie fest, wer informiert wird. Definieren Sie die Gruppe Zu informieren: Wählen Sie, wer über dieses Dokument informiert wird und E-Mail-Benachrichtigungen über Änderungen und Kommentare erhält.
-
Ergänzen Sie Details und speichern Sie. Fügen Sie bei Bedarf eine Beschreibung und Anhänge hinzu. Speichern Sie das Dokument, wenn alle Einstellungen fertig sind.
-
Informieren Sie Ihr Team. Klicken Sie nach Abschluss der Einstellungen auf Benachrichtigung über neue Checkliste senden. Die Gruppe Zu informieren erhält eine E-Mail zur neuen Checkliste.
Änderungsbenachrichtigungen senden
Nach dem Klick wird daraus die Schaltfläche Benachrichtigung über Checklistenänderung senden.
Klicken Sie darauf, wann immer Sie Ihr Team über eine Änderung an der Checkliste informieren möchten, außer bei Kommentaren. Wenn Sie einen Kommentar hinzufügen und auf Speichern & senden klicken, erhält die Gruppe Zu informieren die E-Mail-Benachrichtigungen.
Punkte aktualisieren und freigeben
Punkt aktualisieren
Sobald die Checkliste definiert ist, kann die verantwortliche Person den Status der Punkte aktualisieren (Notizen, Fortschritt, voraussichtlicher Termin usw.). Klicken Sie auf einen Punkt, um ihn zu aktualisieren.
Speichern Sie Ihre Änderungen mit Speichern + Schließen. Mit Senden schicken Sie der verantwortlichen Person einen Kommentar.
Freigabe anfordern
Der festgelegte Freigebende kann einzelne Punkte freigeben. Um eine Freigabe anzufordern, klicken Sie auf das Briefumschlag-Symbol.
E-Mail mit Freigabeanforderung
Der Freigebende erhält eine E-Mail-Benachrichtigung mit einem direkten Link zur Aufgabe.
Punkt freigeben
Der Freigebende gibt den Punkt frei, indem er das Feld Freigeben aktiviert.
Checklisten automatisch erstellen
Automatische Erstellung einrichten
Sie können eine Checkliste auch automatisch erstellen lassen. Öffnen Sie in den Einstellungen die Registerkarte Automatisch erstellen, aktivieren Sie das Feld und legen Sie den Zeitraum fest.
Die Fälligkeitstermine der Maßnahmen in künftigen Checklisten können Sie außerdem vom Erstellungsdatum ableiten.
Automatische Serie erkennen
Neben Ihrem Dokument sehen Sie dann dieses Symbol. Es zeigt an, dass auf Basis dieses Dokuments automatisch neue Checklisten derselben Serie erstellt werden.
Brauchen Sie weitere Hilfe?
Schreiben Sie uns. An Werktagen antworten wir meist innerhalb einer Stunde.