Jak dodawać etykiety do dokumentów standardowych
Tłumaczenie maszynowe z angielskiego. Wyświetlany jest oryginał po angielsku.
Mark your related and standard documents with the same label, and search across all documents quickly and easily.
Video Guide (text instructions are below the video)
To create a new label, you have to be set up with a sufficient role. There are two ways to create a new label: in the system settings, or directly in a document in one step.
Create a label in the system settings
Open the label settings
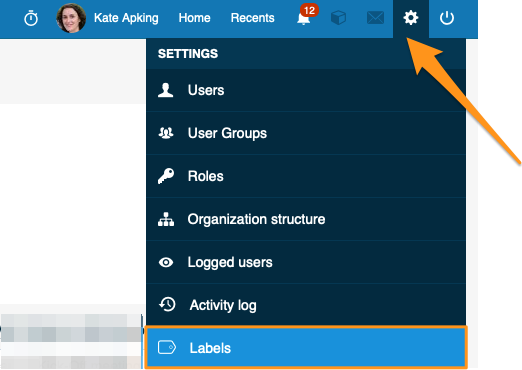
Click the settings button in the upper right corner of your TeamGuru page and choose Labels from the submenu.
Add a new label
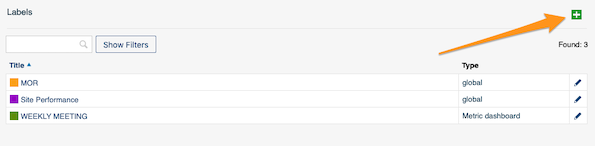
Create a new label by clicking the green plus button.
Set the title, scope and color
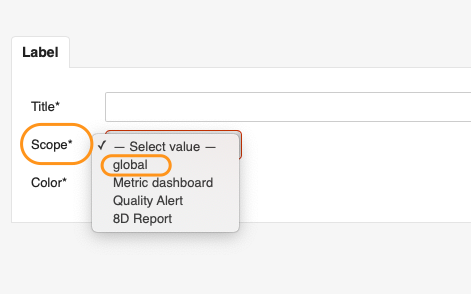
Fill in the Title, Scope and Color. In the scope, you can choose whether the label applies only to Metric dashboards, Quality alerts or 8D reports, or select Global to use it in all three modules.
Choose the locations
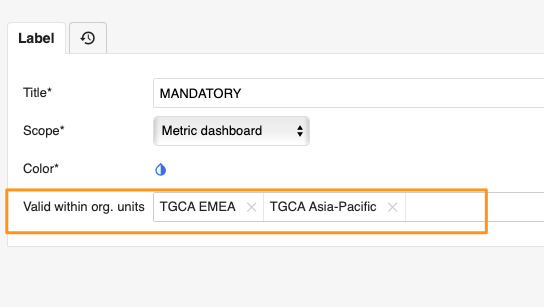
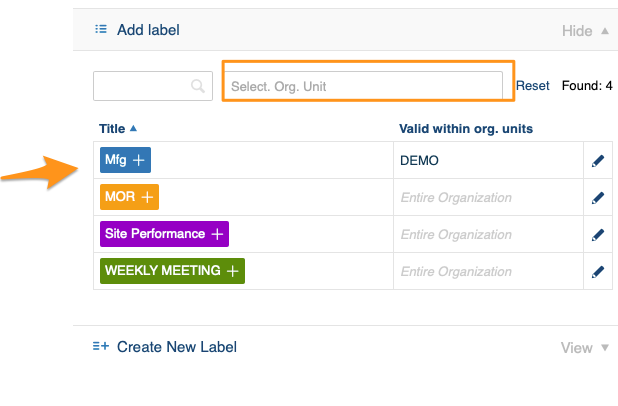
You can also choose the locations (org. unit folders) where the label will be primarily used.
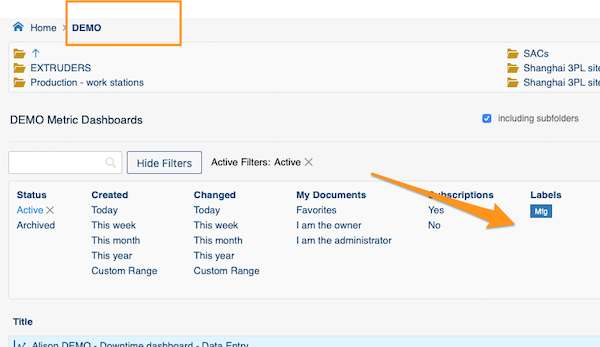
Find the label in the filter
Once the label is added to at least one document, it is displayed in the document filter under the selected org. unit folders.
The exception is a label that already existed in the system and was used for a document in a different location before you selected the locations. Such a label is displayed under that other folder too.
Create and add a label in one step
Open the document settings
Go to the document settings by clicking the edit pencil button.

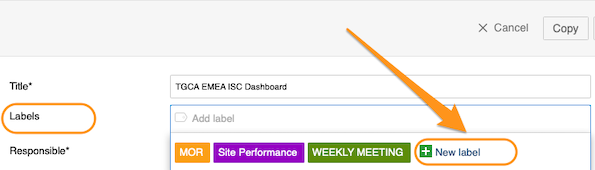
Create the label and select it
Create a new label by clicking the green plus button Create New Label, then select the label for your document.
Add a label to your document
Select labels in the document settings
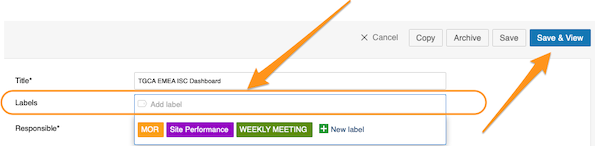
This works the same way as creating and adding a label in one step. Go to your document settings, click into the Labels field and choose from the available options. Click Save or Save & View once you have made your selection.
Labels offered for the document location
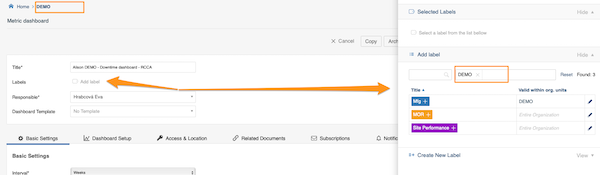
When you add labels to your document, only the labels for that location are offered: the system automatically sets the location in the filter to the document’s location.
Use labels from other locations
Even though a label’s location is specified, users from other locations can still use it too. They just delete the location from the filter, and all labels created and available in the system are shown.
Search documents by labels
Select the folder
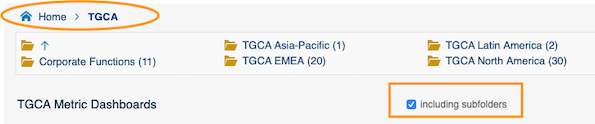
Select the folder where you want to search for your document. Don’t forget to tick the Including subfolders checkbox if you want to see documents from all the subfolders.
Show the filters
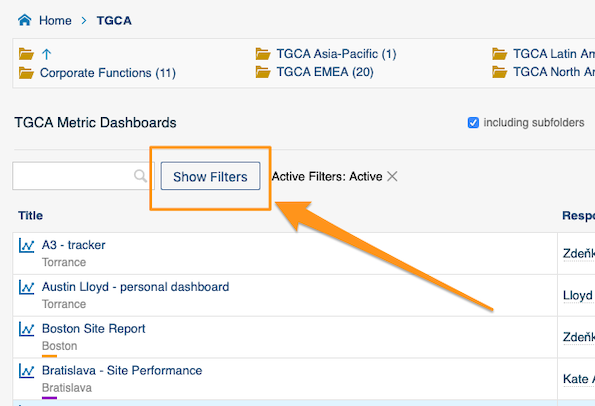
Click Show Filters next to the search field.
Select your label
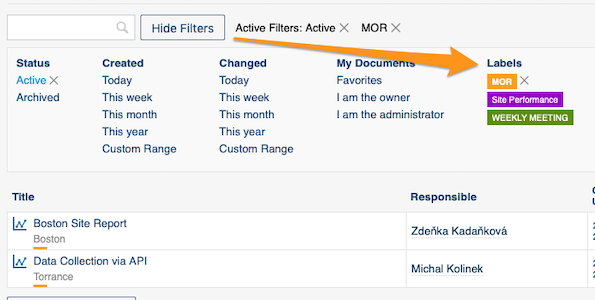
Select your label in the filter.
Related article: How to preselect labels in your project
Oznaczaj powiązane i standardowe dokumenty tą samą etykietą, a szybko i łatwo przeszukasz wszystkie dokumenty.
Samouczek wideo (instrukcja tekstowa znajduje się pod filmem)
Aby utworzyć nową etykietę, musisz mieć odpowiednią rolę. Nową etykietę możesz utworzyć na dwa sposoby: w ustawieniach systemu albo w jednym kroku bezpośrednio w dokumencie.
Utwórz etykietę w ustawieniach systemu
Otwórz ustawienia etykiet
Kliknij przycisk ustawień w prawym górnym rogu strony TeamGuru i wybierz z podmenu Etykiety.
Dodaj nową etykietę
Utwórz nową etykietę, klikając zielony przycisk z plusem.
Ustaw tytuł, zakres i kolor
Uzupełnij pola Tytuł, Zakres i Kolor. W zakresie wybierz, czy etykieta dotyczy tylko dashboardów KPI, alertów jakości lub raportów 8D, albo wybierz Globalny, aby używać jej we wszystkich trzech modułach.
Wybierz lokalizacje
Możesz też wybrać lokalizacje (foldery jednostek organizacyjnych), w których etykieta będzie głównie używana.
Znajdź etykietę w filtrze
Gdy etykieta zostanie dodana do co najmniej jednego dokumentu, pojawi się w filtrze dokumentów pod wybranymi folderami jednostek organizacyjnych.
Wyjątkiem jest etykieta, która istniała już w systemie i została użyta w dokumencie z innej lokalizacji, zanim wybrałeś lokalizacje. Taka etykieta wyświetla się również pod tym drugim folderem.
Utwórz i dodaj etykietę w jednym kroku
Otwórz ustawienia dokumentu
Przejdź do ustawień dokumentu, klikając przycisk z ołówkiem edycji.
Utwórz etykietę i wybierz ją
Utwórz nową etykietę, klikając zielony przycisk z plusem Utwórz nową etykietę, a następnie wybierz ją dla swojego dokumentu.
Dodaj etykietę do dokumentu
Wybierz etykiety w ustawieniach dokumentu
Działa to tak samo jak tworzenie i dodawanie etykiety w jednym kroku. Przejdź do ustawień dokumentu, kliknij pole Etykiety i wybierz spośród dostępnych opcji. Po dokonaniu wyboru kliknij Zapisz lub Zapisz i wyświetl.
Etykiety dostępne dla lokalizacji dokumentu
Podczas dodawania etykiet do dokumentu system proponuje tylko etykiety dla danej lokalizacji: automatycznie ustawia w filtrze lokalizację dokumentu.
Używaj etykiet z innych lokalizacji
Choć etykieta ma określoną lokalizację, użytkownicy z innych lokalizacji również mogą jej używać. Wystarczy, że usuną lokalizację z filtra, a wyświetlą się wszystkie etykiety utworzone i dostępne w systemie.
Wyszukuj dokumenty według etykiet
Wybierz folder
Wybierz folder, w którym chcesz szukać dokumentu. Jeśli chcesz widzieć dokumenty ze wszystkich podfolderów, zaznacz pole Uwzględnij podfoldery.
Pokaż filtry
Kliknij Pokaż filtry obok pola wyszukiwania.
Wybierz etykietę
Wybierz etykietę w filtrze.
Powiązany artykuł: Jak wstępnie wybrać etykiety w projekcie
Potrzebujesz dalszej pomocy?
Napisz do nas. W dni robocze zwykle odpowiadamy w ciągu godziny.