Ako pridať štítky k štandardným dokumentom
Strojový preklad z angličtiny. Zobrazený je anglický originál.
Mark your related and standard documents with the same label, and search across all documents quickly and easily.
Video Guide (text instructions are below the video)
To create a new label, you have to be set up with a sufficient role. There are two ways to create a new label: in the system settings, or directly in a document in one step.
Create a label in the system settings
Open the label settings
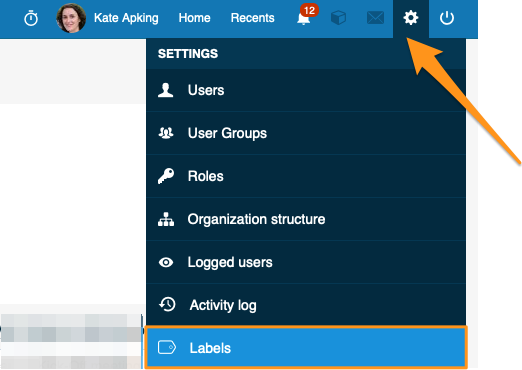
Click the settings button in the upper right corner of your TeamGuru page and choose Labels from the submenu.
Add a new label
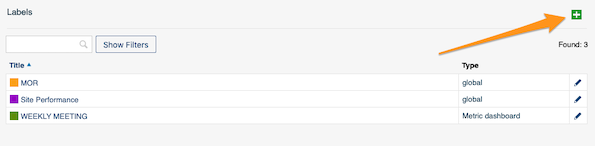
Create a new label by clicking the green plus button.
Set the title, scope and color
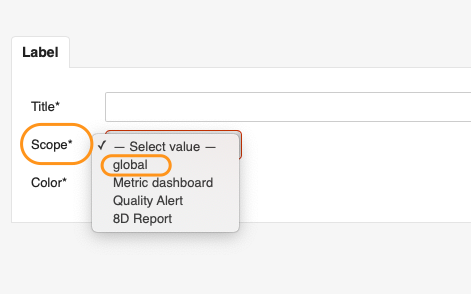
Fill in the Title, Scope and Color. In the scope, you can choose whether the label applies only to Metric dashboards, Quality alerts or 8D reports, or select Global to use it in all three modules.
Choose the locations
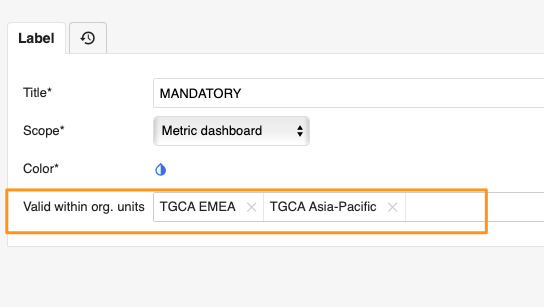
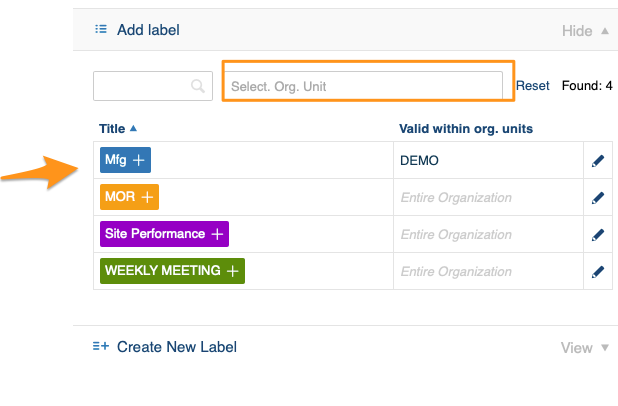
You can also choose the locations (org. unit folders) where the label will be primarily used.
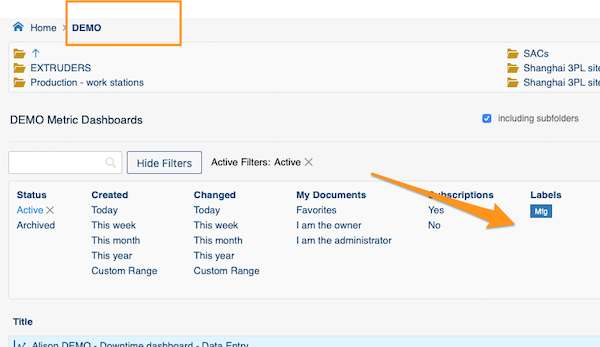
Find the label in the filter
Once the label is added to at least one document, it is displayed in the document filter under the selected org. unit folders.
The exception is a label that already existed in the system and was used for a document in a different location before you selected the locations. Such a label is displayed under that other folder too.
Create and add a label in one step
Open the document settings
Go to the document settings by clicking the edit pencil button.

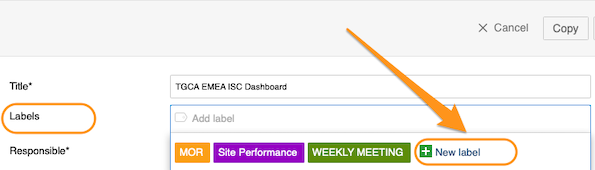
Create the label and select it
Create a new label by clicking the green plus button Create New Label, then select the label for your document.
Add a label to your document
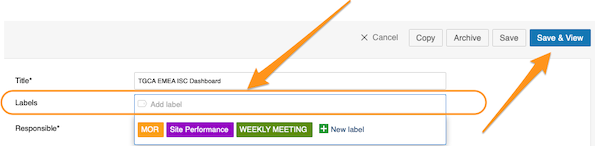
Select labels in the document settings
This works the same way as creating and adding a label in one step. Go to your document settings, click into the Labels field and choose from the available options. Click Save or Save & View once you have made your selection.
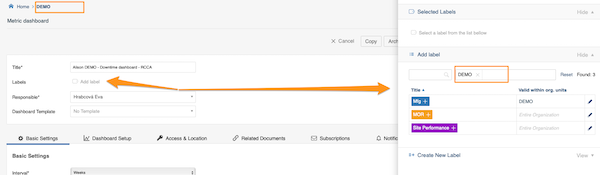
Labels offered for the document location
When you add labels to your document, only the labels for that location are offered: the system automatically sets the location in the filter to the document’s location.
Use labels from other locations
Even though a label’s location is specified, users from other locations can still use it too. They just delete the location from the filter, and all labels created and available in the system are shown.
Search documents by labels
Select the folder
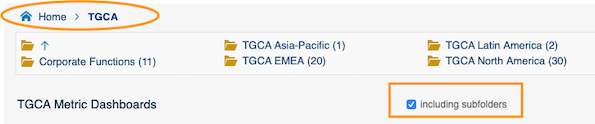
Select the folder where you want to search for your document. Don’t forget to tick the Including subfolders checkbox if you want to see documents from all the subfolders.
Show the filters
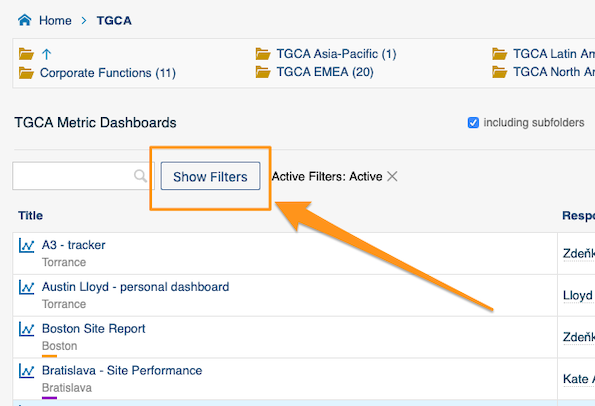
Click Show Filters next to the search field.
Select your label
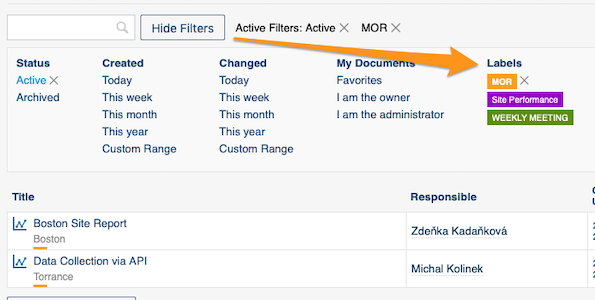
Select your label in the filter.
Related article: How to preselect labels in your project
Označte súvisiace a štandardné dokumenty rovnakým štítkom a vyhľadávajte vo všetkých dokumentoch rýchlo a jednoducho.
Video návod (textový postup nájdete pod videom)
Na vytvorenie nového štítka musíte mať dostatočnú rolu. Nový štítok môžete vytvoriť dvoma spôsobmi: v nastaveniach systému alebo priamo v dokumente v jednom kroku.
Vytvorenie štítka v nastaveniach systému
Otvorte nastavenia štítkov
Kliknite na tlačidlo nastavení v pravom hornom rohu stránky TeamGuru a v podmenu zvoľte Štítky.
Pridajte nový štítok
Nový štítok vytvoríte kliknutím na zelené tlačidlo plus.
Nastavte názov, rozsah a farbu
Vyplňte Názov, Rozsah a Farbu. V rozsahu zvolíte, či sa štítok vzťahuje iba na KPI dashboardy, Alerty kvality alebo 8D reporty, alebo zvolíte Globálny a štítok budete používať vo všetkých troch moduloch.
Zvoľte umiestnenia
Môžete zvoliť aj umiestnenia (priečinky org. jednotiek), kde sa bude štítok primárne používať.
Nájdite štítok vo filtri
Keď štítok pridáte aspoň k jednému dokumentu, zobrazí sa vo filtri dokumentov pod zvolenými priečinkami org. jednotiek.
Výnimkou je štítok, ktorý už v systéme existoval a pred výberom umiestnení bol použitý pri dokumente v inom umiestnení. Takýto štítok sa zobrazí aj pod týmto iným priečinkom.
Vytvorenie a pridanie štítka v jednom kroku
Otvorte nastavenia dokumentu
Do nastavení dokumentu prejdete kliknutím na tlačidlo ceruzky na úpravu.
Vytvorte štítok a vyberte ho
Nový štítok vytvoríte kliknutím na zelené tlačidlo plus Vytvoriť nový štítok. Potom štítok vyberte pre svoj dokument.
Pridanie štítka k dokumentu
Vyberte štítky v nastaveniach dokumentu
Funguje to rovnako ako vytvorenie a pridanie štítka v jednom kroku. Prejdite do nastavení dokumentu, kliknite do poľa Štítky a vyberte z ponúkaných možností. Po výbere kliknite na Uložiť alebo Uložiť a zobraziť.
Štítky ponúkané pre umiestnenie dokumentu
Pri pridávaní štítkov k dokumentu sa ponúkajú iba štítky pre jeho umiestnenie: systém automaticky nastaví vo filtri umiestnenie dokumentu.
Štítky z iných umiestnení
Aj keď má štítok zadané umiestnenie, môžu ho používať aj používatelia z iných umiestnení. Stačí, ak umiestnenie z filtra odstránia, a zobrazia sa všetky štítky vytvorené a dostupné v systéme.
Vyhľadávanie dokumentov podľa štítkov
Zvoľte priečinok
Vyberte priečinok, v ktorom chcete dokument hľadať. Ak chcete vidieť dokumenty zo všetkých podpriečinkov, nezabudnite začiarknuť pole Vrátane podpriečinkov.
Zobrazte filtre
Kliknite na Zobraziť filtre vedľa poľa vyhľadávania.
Vyberte štítok
Vo filtri vyberte svoj štítok.
Súvisiaci článok: Ako predvoliť štítky v projekte
Potrebujete ďalšiu pomoc?
Napíšte nám. V pracovné dni zvyčajne odpovedáme do hodiny.