So versehen Sie Standarddokumente mit Labels
Maschinelle Übersetzung aus dem Englischen. Englisches Original wird angezeigt.
Mark your related and standard documents with the same label, and search across all documents quickly and easily.
Video Guide (text instructions are below the video)
To create a new label, you have to be set up with a sufficient role. There are two ways to create a new label: in the system settings, or directly in a document in one step.
Create a label in the system settings
Open the label settings
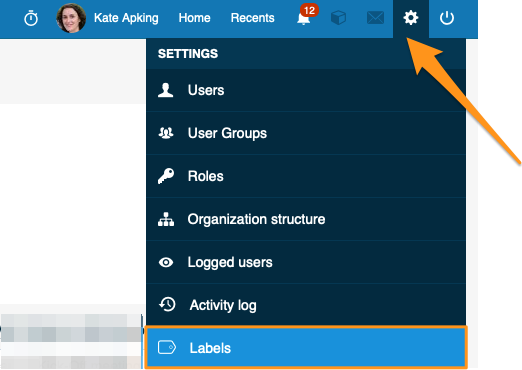
Click the settings button in the upper right corner of your TeamGuru page and choose Labels from the submenu.
Add a new label
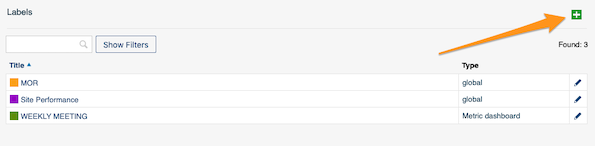
Create a new label by clicking the green plus button.
Set the title, scope and color
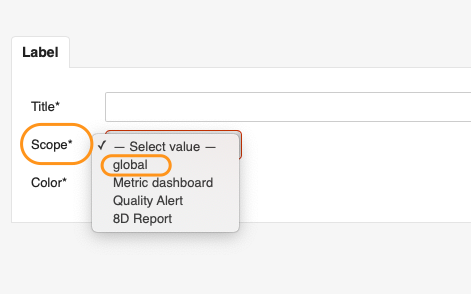
Fill in the Title, Scope and Color. In the scope, you can choose whether the label applies only to Metric dashboards, Quality alerts or 8D reports, or select Global to use it in all three modules.
Choose the locations
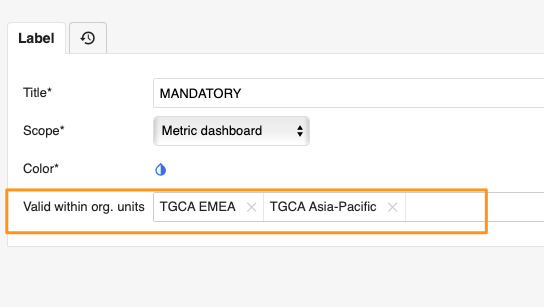
You can also choose the locations (org. unit folders) where the label will be primarily used.
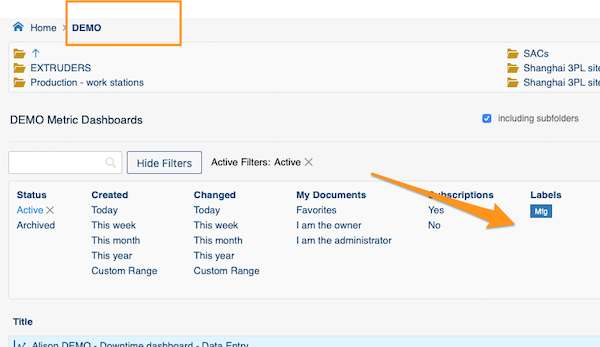
Find the label in the filter
Once the label is added to at least one document, it is displayed in the document filter under the selected org. unit folders.
The exception is a label that already existed in the system and was used for a document in a different location before you selected the locations. Such a label is displayed under that other folder too.
Create and add a label in one step
Open the document settings
Go to the document settings by clicking the edit pencil button.

Create the label and select it
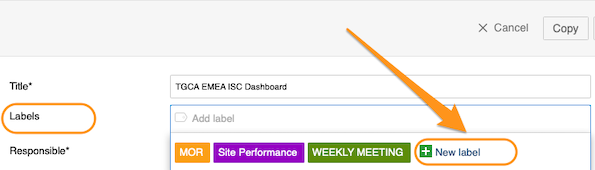
Create a new label by clicking the green plus button Create New Label, then select the label for your document.
Add a label to your document
Select labels in the document settings
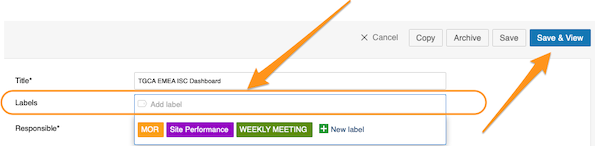
This works the same way as creating and adding a label in one step. Go to your document settings, click into the Labels field and choose from the available options. Click Save or Save & View once you have made your selection.
Labels offered for the document location
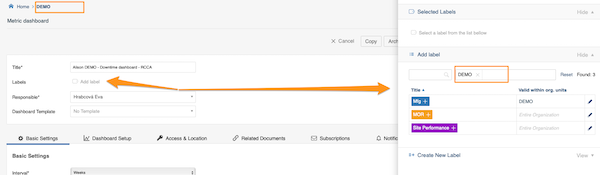
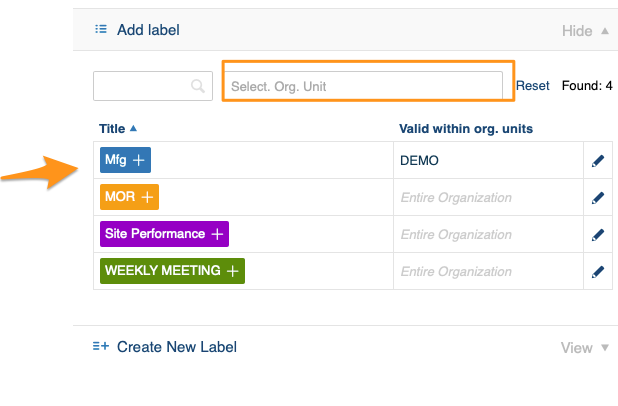
When you add labels to your document, only the labels for that location are offered: the system automatically sets the location in the filter to the document’s location.
Use labels from other locations
Even though a label’s location is specified, users from other locations can still use it too. They just delete the location from the filter, and all labels created and available in the system are shown.
Search documents by labels
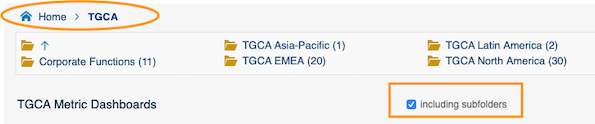
Select the folder
Select the folder where you want to search for your document. Don’t forget to tick the Including subfolders checkbox if you want to see documents from all the subfolders.
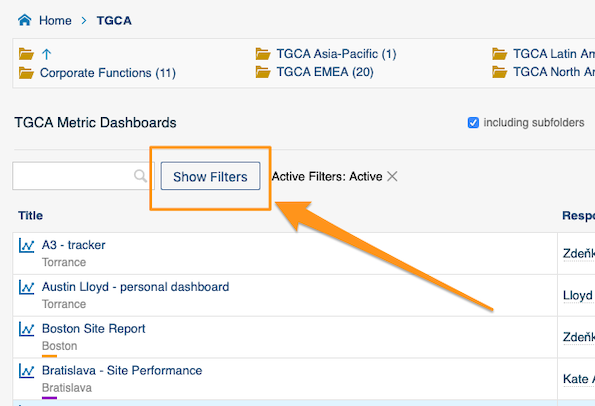
Show the filters
Click Show Filters next to the search field.
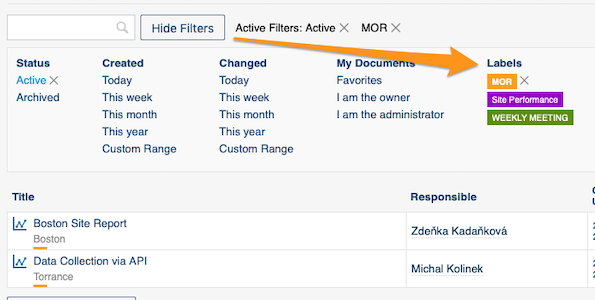
Select your label
Select your label in the filter.
Related article: How to preselect labels in your project
Versehen Sie zusammengehörige und Standarddokumente mit demselben Label und durchsuchen Sie alle Dokumente schnell und einfach.
Video-Anleitung (die Textanleitung finden Sie unter dem Video)
Um ein neues Label anzulegen, brauchen Sie eine ausreichende Rolle. Ein neues Label legen Sie auf zwei Arten an: in den Systemeinstellungen oder direkt im Dokument in einem Schritt.
Label in den Systemeinstellungen anlegen
Label-Einstellungen öffnen
Klicken Sie oben rechts auf Ihrer TeamGuru-Seite auf die Schaltfläche Einstellungen und wählen Sie im Untermenü Labels.
Neues Label hinzufügen
Legen Sie ein neues Label an, indem Sie auf die grüne Plus-Schaltfläche klicken.
Titel, Geltungsbereich und Farbe festlegen
Füllen Sie Titel, Geltungsbereich und Farbe aus. Im Geltungsbereich legen Sie fest, ob das Label nur für KPI-Dashboards, Qualitäts-Alerts oder 8D-Reports gilt, oder Sie wählen Global, um es in allen drei Modulen zu verwenden.
Orte auswählen
Sie können außerdem die Orte (Ordner der Org.-Einheiten) wählen, an denen das Label hauptsächlich verwendet wird.
Label im Filter finden
Sobald das Label mindestens einem Dokument zugeordnet ist, erscheint es im Dokumentfilter unter den ausgewählten Ordnern der Org.-Einheiten.
Ausnahme: Ein Label, das bereits im System existierte und vor der Auswahl der Orte für ein Dokument an einem anderen Ort verwendet wurde. Ein solches Label erscheint auch unter diesem anderen Ordner.
Label in einem Schritt anlegen und zuordnen
Dokumenteinstellungen öffnen
Öffnen Sie die Dokumenteinstellungen mit der Schaltfläche Bearbeiten-Stift.
Label anlegen und auswählen
Legen Sie über die grüne Plus-Schaltfläche Neues Label erstellen ein neues Label an und wählen Sie es dann für Ihr Dokument aus.
Label einem Dokument zuordnen
Labels in den Dokumenteinstellungen auswählen
Das funktioniert genauso wie das Anlegen und Zuordnen eines Labels in einem Schritt. Öffnen Sie die Dokumenteinstellungen, klicken Sie in das Feld Labels und wählen Sie aus den verfügbaren Optionen. Klicken Sie nach der Auswahl auf Speichern oder Speichern & Anzeigen.
Angebotene Labels für den Dokumentort
Wenn Sie Ihrem Dokument Labels zuordnen, werden nur die Labels für dessen Ort angeboten: Das System setzt den Ort im Filter automatisch auf den Ort des Dokuments.
Labels von anderen Orten verwenden
Auch wenn für ein Label ein Ort festgelegt ist, können Benutzer anderer Orte es verwenden. Sie löschen einfach den Ort aus dem Filter, und alle im System angelegten und verfügbaren Labels werden angezeigt.
Dokumente nach Labels suchen
Ordner auswählen
Wählen Sie den Ordner, in dem Sie das Dokument suchen möchten. Aktivieren Sie das Kontrollkästchen Einschließlich Unterordner, wenn Sie Dokumente aus allen Unterordnern sehen möchten.
Filter anzeigen
Klicken Sie neben dem Suchfeld auf Filter anzeigen.
Label auswählen
Wählen Sie Ihr Label im Filter aus.
Verwandter Artikel: So legen Sie Labels in Ihrem Projekt vorab fest
Brauchen Sie weitere Hilfe?
Schreiben Sie uns. An Werktagen antworten wir meist innerhalb einer Stunde.