Nueva actualización del informe
Traducción automática del inglés. Se muestra el original en inglés.
When you need to update your report slide, follow the steps below.
Create the update
-
Open the report. Go to the report document.
-
Select the period. Select the period for the update.
-
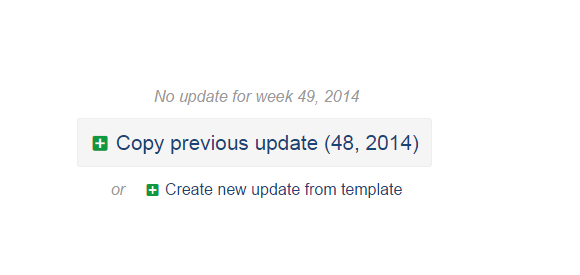
Choose how to create the update. You have two options for updating your slide for a new period:
- Copy previous update – if the slide for the new period will be similar and you only need to change some data.
- Create new update from template – if the new slide update will be completely different from the previous version.
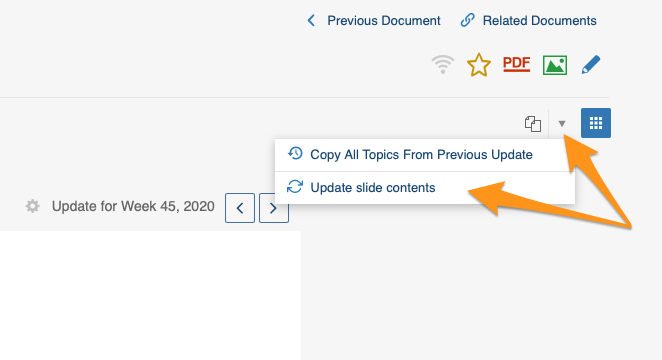
You can also use the Copy All Topics From Previous Update option if you’ve made changes to the previous update (added or deleted slides) and want these changes applied to your report going forward.
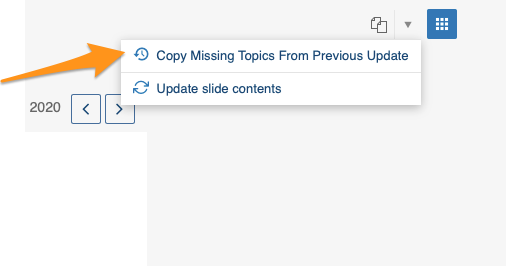
Or use the Copy Missing Topics from Previous Update option if you’ve created a new update but then went back and changed a previous update (added or deleted a slide). Just click this button in your new update and the change is applied.
Please note: Actions widgets and project overview widgets are not updated automatically with live data like the other widgets in the report, but you can update them all at once with Update slide contents.
Edit the slide
-
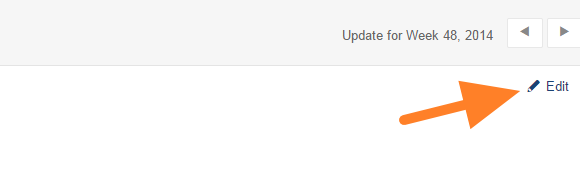
Open the slide in edit mode. Click the Edit icon to update the slide.
-
Update the slide. Update your slide (tips: add a metric chart, add 8D Reports statistics, add a picture).
-
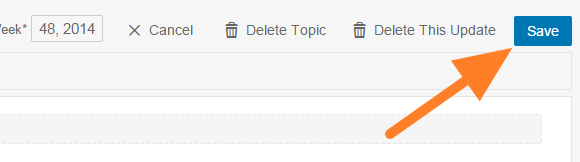
Save the changes. Click the Save button to save your changes.
-
Or discard the changes. Click the Cancel button to discard the changes.
-
Delete the update if needed. Click the Delete This Update button to delete the slide content for the particular period.
-
Delete the topic if needed. Click the Delete this topic button to delete the whole slide from the report (including all the data entered).
Para actualizar una diapositiva del informe, siga estos pasos.
Crear la actualización
-
Abra el informe. Vaya al documento del informe.
-
Seleccione el período. Seleccione el período de la actualización.
-
Elija cómo crear la actualización. Tiene dos opciones para actualizar la diapositiva para un nuevo período:
- Copiar actualización anterior: si la diapositiva del nuevo período será parecida y solo necesita cambiar algunos datos.
- Crear nueva actualización desde plantilla: si la nueva actualización será completamente distinta de la versión anterior.
También puede usar la opción Copiar todos los temas de la actualización anterior si modificó la actualización anterior (agregó o eliminó diapositivas) y quiere que esos cambios se apliquen al informe a partir de ahora.
O bien, use la opción Copiar temas faltantes de la actualización anterior si creó una nueva actualización y después volvió a modificar una actualización anterior (agregó o eliminó una diapositiva). Basta con hacer clic en este botón en la nueva actualización para aplicar el cambio.
Tenga en cuenta: los widgets de acciones y de resumen de proyectos no se actualizan automáticamente con datos en vivo como los demás widgets del informe, pero puede actualizarlos todos a la vez con Actualizar contenido de la diapositiva.
Editar la diapositiva
-
Abra la diapositiva en modo de edición. Haga clic en el icono Editar para actualizar la diapositiva.
-
Actualice la diapositiva. Actualice la diapositiva (consejos: agregar un gráfico de métrica, agregar estadísticas de Informes 8D, agregar una imagen).
-
Guarde los cambios. Haga clic en el botón Guardar para guardar los cambios.
-
O descarte los cambios. Haga clic en el botón Cancelar para descartar los cambios.
-
Elimine la actualización si es necesario. Haga clic en el botón Eliminar esta actualización para eliminar el contenido de la diapositiva del período correspondiente.
-
Elimine el tema si es necesario. Haga clic en el botón Eliminar este tema para eliminar toda la diapositiva del informe (con todos los datos ingresados).
¿Necesita más ayuda?
Escríbanos. En días laborables solemos responder en menos de una hora.