Jak utworzyć nowy dokument
Tłumaczenie maszynowe z angielskiego. Wyświetlany jest oryginał po angielsku.
The Documents module helps you organize your company’s internal documentation and always works with the latest approved version. You can trace who was informed about a document and when, and who should be informed about a new version.
The Documents module can be linked with the Skill Matrix module. You then know exactly which employees should be informed about a document update when knowledge of the document is needed for a particular skill.
Choose how to create the document
There are 3 ways to create a new document:

-
File Download. Attach your document as a PDF.
-
Editable Text. Create the document directly in TeamGuru.
-
Work Instruction with Steps. A document divided into several steps, in which you can type text and add photos, pictures, timing and materials. For more details, see How to create a working instruction document.
Before you create your first document, you have to set up your document type (SOP, Manual, Work Instructions, etc.). For more details, see How to create a new document type. Once the document type is created, you can start creating your document.
Fill in the document
-
Add a new document. Go to the Documents module and click the Add icon.

-
Fill in the requested data.
-
Select the responsible person.
-
Choose the approvers. Choose one or more approvers for the document.
-
Set up the header details. Set up all the header details: document type, version and validity.
-
Choose the document content. Choose whether you want to upload the document from your PC and save it as an attachment, create a new one (the Editable Text option), or use the Work Instruction with Steps option.
- Attached document = the PDF format of your uploaded file
- Attachment – source file = your original file in XLS, PPT, DOC, etc.
- Attachments = attachments related to your document that other users can open and download
-
Save before entering steps. If you select Work Instruction with Steps, you have to save the document first to be able to start entering the steps.
-
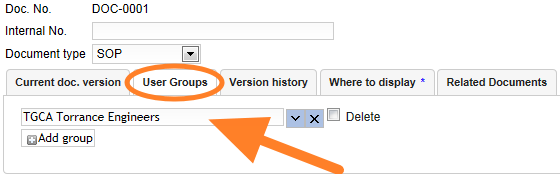
Select the user groups to inform. Go to the User groups tab and select the group to be informed about the document. Here you can predefine which employees are required to learn about the document. If you do not know how to create a new user group, see Where to set up a new user group.
Send the document for approval
-
Save the draft. Click Save & View if you need to make other changes later. The document stays as a draft.
-
Send it for approval. Click Save & Send for Approval if no more changes are to be made.
-
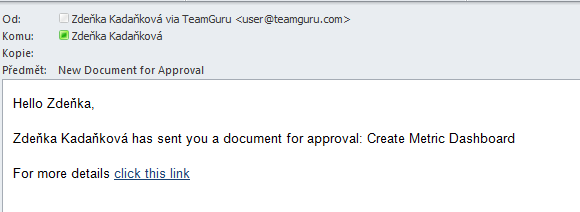
Approvers are notified. The approvers receive an email notification asking them to approve the document.
-
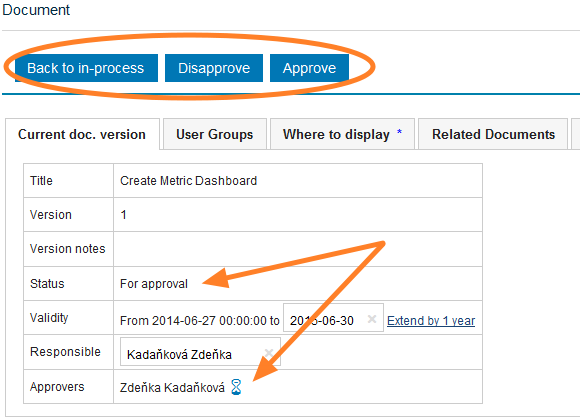
The approver decides. The approver approves or disapproves the document, or returns it to the in-process status.
If any changes need to be made to an approved (active) document, a new version needs to be created. In such a case, see How to create a new document version.
Moduł Dokumenty pomaga uporządkować wewnętrzną dokumentację firmy i zawsze pracować na najnowszej zatwierdzonej wersji. Widzisz, kto i kiedy został poinformowany o dokumencie oraz kogo trzeba poinformować o nowej wersji.
Moduł Dokumenty można połączyć z modułem Matryca kompetencji. Wiesz wtedy dokładnie, których pracowników poinformować o aktualizacji dokumentu, gdy jego znajomość jest wymagana dla danej kompetencji.
Wybierz sposób tworzenia dokumentu
Nowy dokument możesz utworzyć na 3 sposoby:
-
Plik do pobrania. Dołącz dokument jako PDF.
-
Tekst edytowalny. Utwórz dokument bezpośrednio w TeamGuru.
-
Instrukcja stanowiskowa z krokami. Dokument podzielony na kroki, w których wpisujesz tekst i dodajesz zdjęcia, obrazy, czasy i materiały. Więcej informacji znajdziesz w artykule Jak utworzyć instrukcję stanowiskową.
Zanim utworzysz pierwszy dokument, musisz ustawić typ dokumentu (SOP, instrukcja obsługi, instrukcja stanowiskowa itd.). Więcej informacji znajdziesz w artykule Jak utworzyć nowy typ dokumentu. Gdy typ dokumentu jest gotowy, możesz zacząć tworzyć dokument.
Wypełnij dokument
-
Dodaj nowy dokument. Otwórz moduł Dokumenty i kliknij ikonę Dodaj.
-
Wypełnij wymagane dane.
-
Wybierz osobę odpowiedzialną.
-
Wybierz osoby zatwierdzające. Wybierz jedną lub kilka osób, które zatwierdzą dokument.
-
Uzupełnij nagłówek. Uzupełnij wszystkie dane nagłówka: typ dokumentu, wersję i ważność.
-
Wybierz treść dokumentu. Zdecyduj, czy wgrać dokument z komputera i zapisać go jako załącznik, utworzyć nowy (opcja Tekst edytowalny), czy użyć opcji Instrukcja stanowiskowa z krokami.
- Dołączony dokument = wgrany plik w formacie PDF
- Załącznik – plik źródłowy = oryginalny plik XLS, PPT, DOC itd.
- Załączniki = załączniki związane z dokumentem, które inni użytkownicy mogą otworzyć i pobrać
-
Zapisz przed dodaniem kroków. Jeśli wybierzesz Instrukcja stanowiskowa z krokami, najpierw zapisz dokument, aby móc dodawać kroki.
-
Wybierz grupy użytkowników do poinformowania. Otwórz kartę Grupy użytkowników i wybierz grupę, którą trzeba poinformować o dokumencie. Tu z góry określasz, którzy pracownicy muszą zapoznać się z dokumentem. Jeśli nie wiesz, jak utworzyć nową grupę użytkowników, zobacz Gdzie utworzyć nową grupę użytkowników.
Wyślij dokument do zatwierdzenia
-
Zapisz wersję roboczą. Kliknij Zapisz i wyświetl, jeśli chcesz później coś jeszcze zmienić. Dokument pozostaje wersją roboczą.
-
Wyślij do zatwierdzenia. Kliknij Zapisz i wyślij do zatwierdzenia, jeśli nie planujesz więcej zmian.
-
Osoby zatwierdzające dostają powiadomienie. Osoby zatwierdzające otrzymują e-mail z prośbą o zatwierdzenie dokumentu.
-
Osoba zatwierdzająca decyduje. Osoba zatwierdzająca zatwierdza lub odrzuca dokument albo przywraca mu status „w opracowaniu”.
Jeśli w zatwierdzonym (aktywnym) dokumencie trzeba coś zmienić, należy utworzyć nową wersję. Zobacz wtedy Jak utworzyć nową wersję dokumentu.
Potrzebujesz dalszej pomocy?
Napisz do nas. W dni robocze zwykle odpowiadamy w ciągu godziny.