Cómo crear un nuevo indicador: configuración básica
Traducción automática del inglés. Se muestra el original en inglés.
Creating a metric in the system requires sufficient access. To keep metrics standardized across your company, agree internally on the name of each metric and its purpose. This ensures that everyone understands and uses the correct metrics.
We recommend contacting your system administrator when you need to create a new metric.
Create a new metric
-
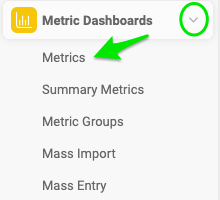
Open the metric list. Go to Metric Dashboards and select Metrics in the submenu.
-
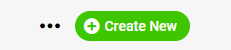
Add a new metric. Click the Add icon to add a new metric.
-
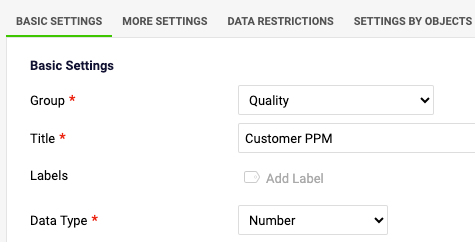
Fill in the basic settings. Fill in the metric definition in the Basic Settings section, as described below.
Basic settings of a metric
Select the group and title
Select the metric Group and fill in the Title of the metric. The title is visible in your dashboards.
Add labels
You can add metric Labels: use an existing label or create a new one. The metric label is displayed in all dashboards where the metric is used. You can also select for which part of the organization the label is used.
Select the data type
Select the Data Type: Number, Percentage, Date, Yes/No metric, or Text metric.
Set the units
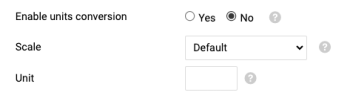
- Choose Yes if you want to enable units conversion.
- Choose a Scale (for thousands, millions, etc.) if needed.
- Fill in the measurement Unit (a symbol or abbreviation, e.g. $, €, USD).
Protect the metric
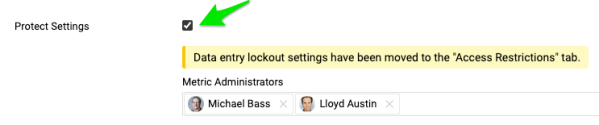
Protect Metric: if you tick this box, only the selected metric administrators can edit the metric’s settings.
Set the valid range of values
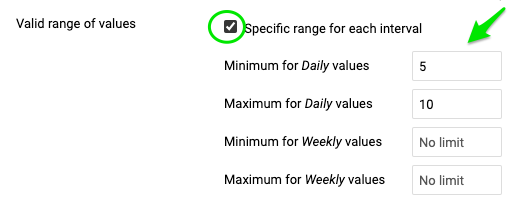
Valid range of values: define the minimum and maximum value for each time period, so that users cannot enter lower or higher values than defined.
Set the background color
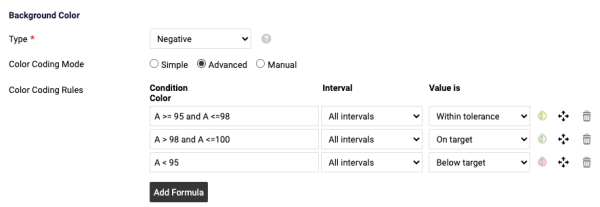
- Background Color: the metric type can be negative, positive or exact value.
- With the Simple color coding mode, you specify whether the values are compared to the Plan or to the Forecast values. If the priority is set to Forecast but you enter only Plan values, the values are automatically compared to the Plan values.
- With the Advanced color coding mode, you can customize the metric color coding according to the conditions you define.
Besides the metric’s basic settings, you can also set up additional rules on the other tabs.
Video guide: How to create a new metric
Related video guides: Enable Unit Conversion, Metric’s Definition & Related documents
Para crear un indicador en el sistema necesita acceso suficiente. Para mantener los indicadores estandarizados en toda la empresa, acuerden internamente el nombre y el propósito de cada indicador. Así todos entienden y usan los indicadores correctos.
Le recomendamos contactar al administrador de su sistema cuando necesite crear un nuevo indicador.
Crear un nuevo indicador
-
Abra la lista de indicadores. Vaya a Dashboards de KPI y elija Indicadores en el submenú.
-
Agregue un nuevo indicador. Haga clic en el ícono Agregar para agregar un nuevo indicador.
-
Complete la configuración básica. Complete la definición del indicador en la sección Configuración básica, como se describe a continuación.
Configuración básica de un indicador
Elegir el grupo y el título
Elija el Grupo del indicador y escriba su Título. El título se ve en sus dashboards.
Agregar etiquetas
Puede agregar Etiquetas al indicador: use una etiqueta existente o cree una nueva. La etiqueta se muestra en todos los dashboards donde se usa el indicador. También puede elegir en qué parte de la organización se usa la etiqueta.
Elegir el tipo de dato
Elija el Tipo de dato: Número, Porcentaje, Fecha, indicador Sí/No o indicador de texto.
Configurar las unidades
- Elija Sí si quiere activar la conversión de unidades.
- Si lo necesita, elija una Escala (miles, millones, etc.).
- Escriba la Unidad de medida (un símbolo o abreviatura, por ejemplo, $, €, USD).
Proteger el indicador
Proteger indicador: si marca esta casilla, solo los administradores del indicador seleccionados pueden editar su configuración.
Definir el rango de valores válidos
Rango de valores válidos: defina el valor mínimo y máximo de cada periodo, para que los usuarios no puedan capturar valores fuera de ese rango.
Configurar el color de fondo
- Color de fondo: el tipo de indicador puede ser negativo, positivo o valor exacto.
- Con el modo de colores Simple, indica si los valores se comparan con el plan o con el pronóstico. Si la prioridad es el pronóstico pero solo captura valores de plan, los valores se comparan automáticamente con el plan.
- Con el modo de colores Avanzado, puede personalizar los colores del indicador según las condiciones que defina.
Además de la configuración básica del indicador, puede definir reglas adicionales en las otras pestañas.
Video: cómo crear un nuevo indicador
Videos relacionados: Activar la conversión de unidades, Definición del indicador y documentos relacionados
¿Necesita más ayuda?
Escríbanos. En días laborables solemos responder en menos de una hora.