如何创建新指标:基本设置
本文由英文机器翻译。 当前显示英文原文。
Creating a metric in the system requires sufficient access. To keep metrics standardized across your company, agree internally on the name of each metric and its purpose. This ensures that everyone understands and uses the correct metrics.
We recommend contacting your system administrator when you need to create a new metric.
Create a new metric
-
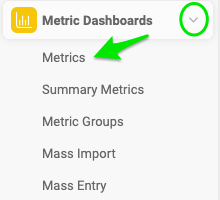
Open the metric list. Go to Metric Dashboards and select Metrics in the submenu.
-
Add a new metric. Click the Add icon to add a new metric.
-
Fill in the basic settings. Fill in the metric definition in the Basic Settings section, as described below.
Basic settings of a metric
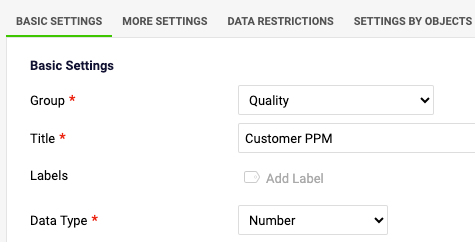
Select the group and title
Select the metric Group and fill in the Title of the metric. The title is visible in your dashboards.
Add labels
You can add metric Labels: use an existing label or create a new one. The metric label is displayed in all dashboards where the metric is used. You can also select for which part of the organization the label is used.
Select the data type
Select the Data Type: Number, Percentage, Date, Yes/No metric, or Text metric.
Set the units
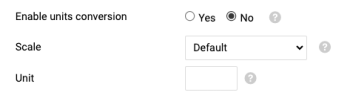
- Choose Yes if you want to enable units conversion.
- Choose a Scale (for thousands, millions, etc.) if needed.
- Fill in the measurement Unit (a symbol or abbreviation, e.g. $, €, USD).
Protect the metric
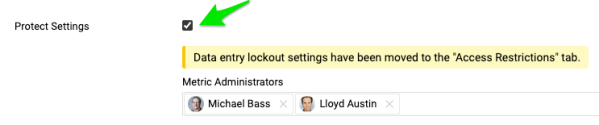
Protect Metric: if you tick this box, only the selected metric administrators can edit the metric’s settings.
Set the valid range of values
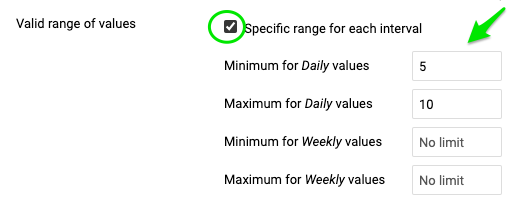
Valid range of values: define the minimum and maximum value for each time period, so that users cannot enter lower or higher values than defined.
Set the background color
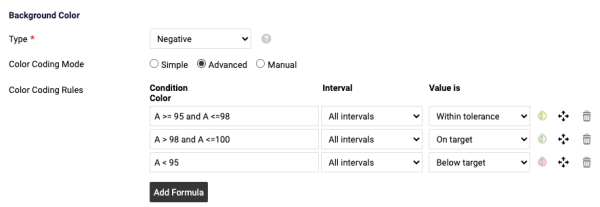
- Background Color: the metric type can be negative, positive or exact value.
- With the Simple color coding mode, you specify whether the values are compared to the Plan or to the Forecast values. If the priority is set to Forecast but you enter only Plan values, the values are automatically compared to the Plan values.
- With the Advanced color coding mode, you can customize the metric color coding according to the conditions you define.
Besides the metric’s basic settings, you can also set up additional rules on the other tabs.
Video guide: How to create a new metric
Related video guides: Enable Unit Conversion, Metric’s Definition & Related documents
在系统中创建指标需要具备相应的权限。为保持全公司指标的标准化,请在内部统一每个指标的名称和用途,确保每个人都理解并使用正确的指标。
需要创建新指标时,建议联系您的系统管理员。
创建新指标
-
打开指标列表。 进入 指标仪表板,在子菜单中选择 指标。
-
添加新指标。 点击 添加 图标,添加新指标。
-
填写基本设置。 按下文说明,在 基本设置 部分填写指标定义。
指标的基本设置
选择分组和标题
选择指标的 分组,并填写指标的 标题。标题会显示在仪表板中。
添加标签
您可以添加指标 标签:使用现有标签或创建新标签。指标标签会显示在使用该指标的所有仪表板中。您还可以选择该标签适用于组织的哪个部分。
选择数据类型
选择 数据类型:数值、百分比、日期、是/否指标或文本指标。
设置单位
- 如需启用单位换算,请选择 是。
- 如有需要,选择 量级(千、百万等)。
- 填写计量 单位(符号或缩写,例如$、€、USD)。
保护指标
保护指标:勾选此项后,只有选定的指标管理员才能编辑该指标的设置。
设置有效值范围
有效值范围:为每个时间段定义最小值和最大值,用户将无法输入超出此范围的值。
设置背景颜色
- 背景颜色:指标类型可以是 负向、正向 或 精确值。
- 在 简单 颜色标识模式下,您可以指定数值与计划值还是预测值进行比较。如果优先级设为预测值,但您只录入了计划值,则数值会自动与计划值比较。
- 在 高级 颜色标识模式下,您可以根据自己定义的条件自定义指标的颜色标识。
除了指标的基本设置外,您还可以在其他选项卡中设置更多规则。
视频教程:如何创建新指标
还需要帮助吗?
请给我们留言。工作日我们通常会在一小时内回复。